Link
http://www.youtube.com/watch?v=cdmYkjnmndY
Saturday, July 2, 2011
Saturday, May 28, 2011
Thursday, April 7, 2011
The Scamp Project...
So... after a full day of animating I have my first full test shot.
Now, by spending a day with the rig, I was able to see some weaknesses.

It's not by any means, ever, a good idea to build a rig that can't be updated without having to rebuild it. So I didn't and am thankful for it. Overall the rig worked but it lacked precision. I added more controls and that helped things.
Key framing the rig was difficult because of its refusal to accept character sets.
The blendshapes needed some work so it was back to zbrush for sculpting.
Now to the flip camera.
The best way to stabilize the camera is to keep your hands as far away as possible. So by playing with some pipe in our barn, I found that by using a clamp to attach it to the pipe I could create a make-shift steady cam.
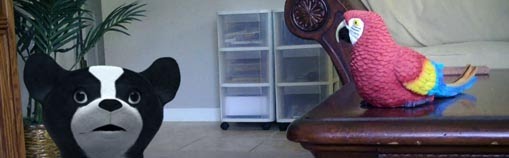
When I composited all the videos together I was pleasantly surprised how color-correctable it was. Now I couldn't go crazy but I could play with the contrast enough that I could get a natural color balance.
^^^Not the best example but the post need more images.
Now, by spending a day with the rig, I was able to see some weaknesses.

It's not by any means, ever, a good idea to build a rig that can't be updated without having to rebuild it. So I didn't and am thankful for it. Overall the rig worked but it lacked precision. I added more controls and that helped things.
Key framing the rig was difficult because of its refusal to accept character sets.
The blendshapes needed some work so it was back to zbrush for sculpting.
Now to the flip camera.
The best way to stabilize the camera is to keep your hands as far away as possible. So by playing with some pipe in our barn, I found that by using a clamp to attach it to the pipe I could create a make-shift steady cam.
When I composited all the videos together I was pleasantly surprised how color-correctable it was. Now I couldn't go crazy but I could play with the contrast enough that I could get a natural color balance.
^^^Not the best example but the post need more images.
Monday, April 4, 2011
The Scamp Project...

I spent most of Friday filming the rest of the original episode only to find out on Saturday all that video would be useless. There are two reasons for this. One, I didn't have enough light in the scene, and two, this video couldn't be tracked.

I use Voodoo to track all the video shots and most of the time it does a pretty good job. But after some experimentation I learned that it needs as high resolution footage as possible and you want to make sure there's at least one object in the foreground or the background that has a sharp contrast. I was filming in a room and most of the shots had a white wall and a dresser in the background. I thought I could track the dresser as it's mostly dark wood but I found since I held the camera instead of using a tripod (trying to go for a filmed look...I think that's the right word) I was able to hold it relatively still so the movements were very fine. Voodoo was not able to track this because its slip was to my knowledge smaller than the amount of shake I had in the video footage. Therefore it didn't track anything. My suggestion is, if you're going to do this, make sure you move the camera a fair amount or just put it on a tripod.
Now for light, I couldn't use a vast collection of light bulbs to light scene because I was trying to go for natural sunlight, but I simply wasn't getting enough light and apparently the place I was trying to film was conveniently being put in the dark by a large piece of furniture.
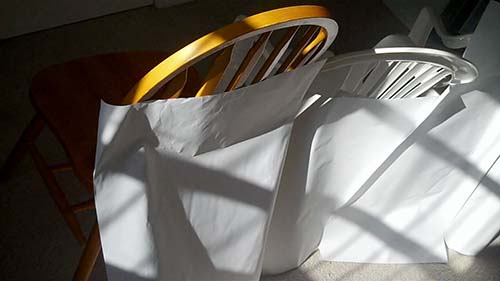
Bounce-boards were my solution. I took some white drawing paper and basically leaned it against the backs of some chairs. I lined the chairs so it bounced light coming through the window, have it make a 90 degree turn, and land on my subject. I used three chairs and I was actually able to get pretty good results. Since I was filming with a Flip camera. I found that the more light I had the sharper my image would be (mentioned this in the last post).
After re-filming everything on Sunday (actually, I reverted to another scene I was going to go with later and decided to use now) using the knowledge I gained, I was able to get some usable video footage. Sunday afternoon was spent tracking in Voodoo.
Note to anyone trying this: Set aside a good couple of hours to track your video footage and take multiple takes to make sure you have some selection in case one video refuses to be tracked.
I want a depth-of-field effect in some of my shots and luckily my subjects are small enough I could use the magnifying glass I mentioned in my tutorial and I was able to achieve this. Another thing I learned is you can use reading glasses as a way of focusing the little camera. Once again, I was also able to achieve a good DOF effect.

For the next couple of days I'll be animating and uploading sample videos online (not sure what video platform but the web show itself will be on Youtube).
Friday, April 1, 2011
The Scamp Project
Okay, big news. As you may know, this blog's been dead since I started it. I've been working on the final details of my project. Well, it's not completely mine, but nobody has to know. It's going to be a web series surrounding a stuffed humanoid dog. The dog will be completely digital while the background will be filmed using a Flip camera, and it will be put on YouTube in HD. In theory this seems pretty easy, but I've run into quite a few technical issues trying to accomplish this.
The first thing I came across was the camera itself – it wasn't really designed for this. Well it was designed for YouTube, just not video tracking or any type of image stabilization. I'll talk more about those two later. First thing I want to bring to your attention is it has no manual contrast adjustment. It really has no manual adjustments at all. This creates a problem because when you're moving the camera around a scene and it, say, passes a window, it re-exposes, wreaking havoc on your rendering rig, trying to blend the model with the background. This really brings you to the point where you have to start lighting every frame individually.
Still talking about the camera, it's image sensor is surprisingly sensitive to low light, considering it's price-point, but to get video quality good enough, you have to light rooms well. Really well. I find it interesting that as long as the camera doesn't seem to have to do too much of its magically contrast adjustment the image quality stays pretty good, but once the camera starts feeling that it has to change its contrast, the image quality greatly degrades. So my tip if you intend to use this camera is try to watch for when your camera decides it's smarter than you. I assure you, it isn't. Well, then again, I've never met you, you could be a real moron, so you be the judge of that.
Now getting the video back into the computer isn't too hard, except for the fact that FlipShare conflicts with every program on my computer. I can't have Maya open with FlipShare open, but that's not normally necessary so this is more of a pet peeve.
The first thing you need to do is convert your video into image sequences. You can basically forget about the audio. I'm going to be using a separate mic and recording with that. It's not that the mic on the camera's bad, it's just most of the time the only object talking will be the stuffed animal.
P.s. I use PNG images for my image sequence.
Now for tracking, I'm using a mixture of Maya Live and Voodoo. In a later blog post and tutorial I'll go in depth on the subject. But for now, I'll just leave you with it's not that hard.
Now for the digital stuffed animal – his name is Scamp. I fell back on trusty Maya and began modeling from some drawings that my sister drew me. I went through about four different versions of him until I came to the one I liked.

He's rigged using a really primitive rig – nothing special. Just mostly parenting joints to curves and a couple of constraints. The reason I went with this is because of the wide variety of movements he has to do. I'll just add stuff on an as-needed shot-by-shot basis to conserve memory.
So that's basically what I've learned up to this point, with an exception of a few details. If you want to follow this project from the video side of it, hang tight on this blog. To learn more about the digital side of it, my 3dTutorialZone blog and website will be updating with tutorials on how I got this done.
Thanks for reading.
And for those who just skipped to the bottom, don't worry. The next post will have more pictures.
Monday, March 14, 2011
First Useful Post (Macro Lens)
Okay, so, most really cheap cameras don't have a macro lens.

Exception of Sanyo VPC-CG20 High Definition Camcorder.
So the quickest and easiest way to do this is to use a magnifying glass.
Things You'll Need:
Do I really need to type this out?
Place camera behind magnifying glass. Place magnifying glass over object you wish you view with camera still being held behind it.
This can be made easier by wrapping some elastic bands between the camera and the magnifying glass. It's temporary, and it should hold, as long as you're careful. The trick is making sure the objects are actually in focus. This may take a little moving in and out. Once you've got the right distance, use a free finger to try and keep the distance between the object and the camera.
Image To Show Off Results
(Camera - Flip)


Exception of Sanyo VPC-CG20 High Definition Camcorder.
So the quickest and easiest way to do this is to use a magnifying glass.
Things You'll Need:
- Magnifying glass with not too big of a lens, but still bigger than the cameras lens
- Camera
- Elastic bands
Do I really need to type this out?
Place camera behind magnifying glass. Place magnifying glass over object you wish you view with camera still being held behind it.
This can be made easier by wrapping some elastic bands between the camera and the magnifying glass. It's temporary, and it should hold, as long as you're careful. The trick is making sure the objects are actually in focus. This may take a little moving in and out. Once you've got the right distance, use a free finger to try and keep the distance between the object and the camera.

Image To Show Off Results
(Camera - Flip)
First Post
Anyone besides me noticed that the suggestion tags saying "scooter", "vacation", and "fall" sound like you were riding a scooter on vacation and you just went in for an epic faceplant?...
I'd teach you how to videotape it.
In this blog, I'll be talking about how to maximize your cheap budget camcorder. And while you're at it, put your RSS feed button to good use.
Wink wink.
I'd teach you how to videotape it.
In this blog, I'll be talking about how to maximize your cheap budget camcorder. And while you're at it, put your RSS feed button to good use.
Wink wink.
Subscribe to:
Posts (Atom)